vue脚手架
安装后,进入脚手架目录
npm install
npm run dev
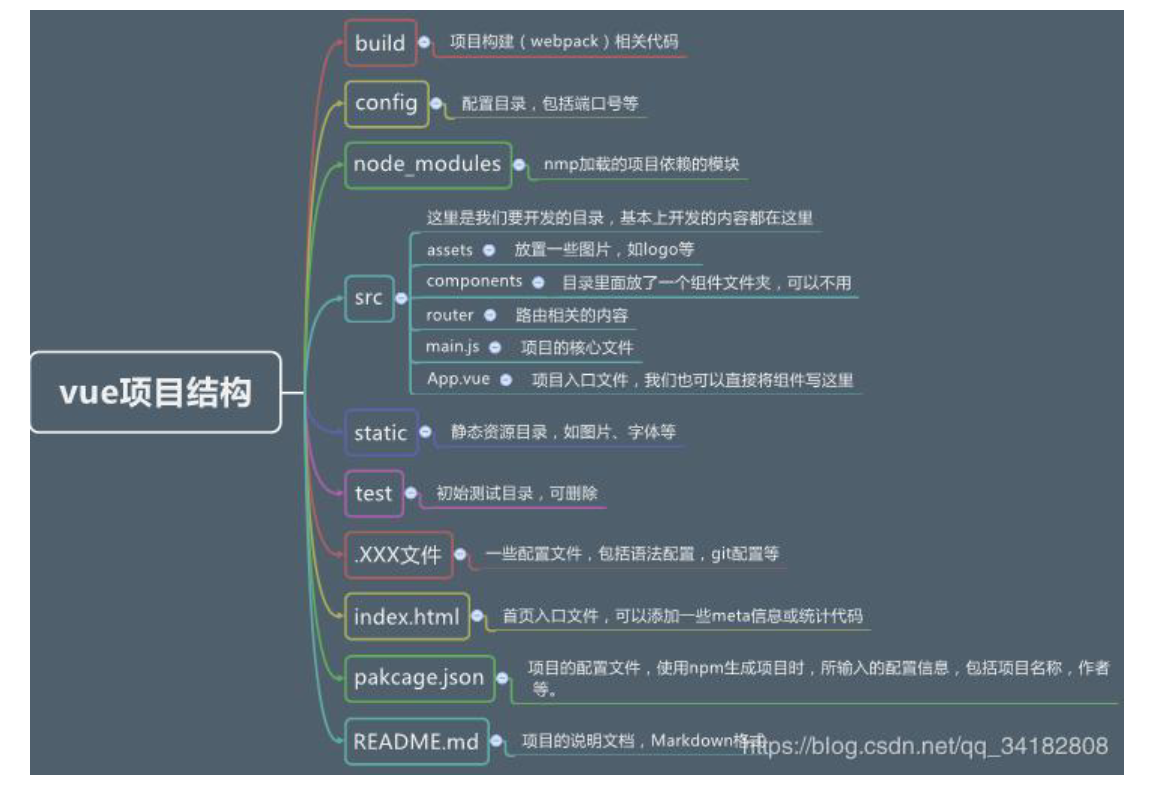
项目结构
main.js 解析
import Vue from 'vue' //从node_modules导入
import App from './App' //从当前目录导入App.vue
import router from './router' //导入router文件夹内的index.js
index.js
import HelloWorld from '@/components/HelloWorld'//@表示src
路由
login.vue
<template>

</template>

<script>
export default {
  name: "login"
}
</script>

<style scoped>
/*scoped只在当前组件起作用,不影响父组件*/

</style>
router/index.js
import Vue from 'vue'
import Router from 'vue-router'
// import HelloWorld from '@/components/HelloWorld'
import Login from '@/components/Login'

Vue.use(Router)

export default new Router({
  routes: [
    // {
    //   path: '/',
    //   name: 'HelloWorld',
    //   component: HelloWorld
    // }
    {
      path:'/', //默认路由,跳转至/Login
      redirect:'/Login'
    },
    {
      path:'/Login', //可以直接为'/', 如果没有根路由,必须加前面的跳转
      name:'Login',
      component: Login
    }
  ]
})
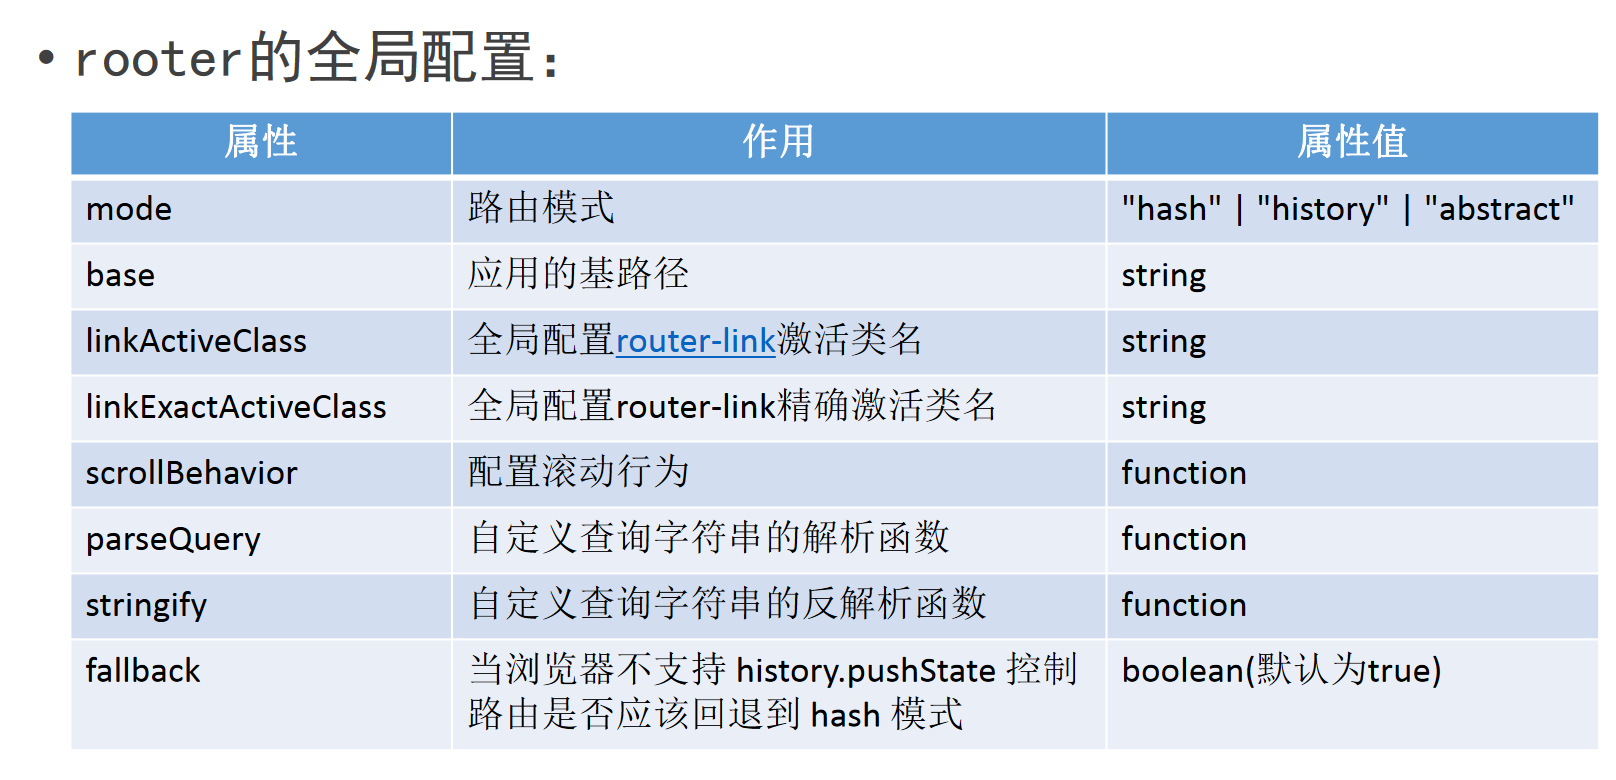
路由模式
路由配置项

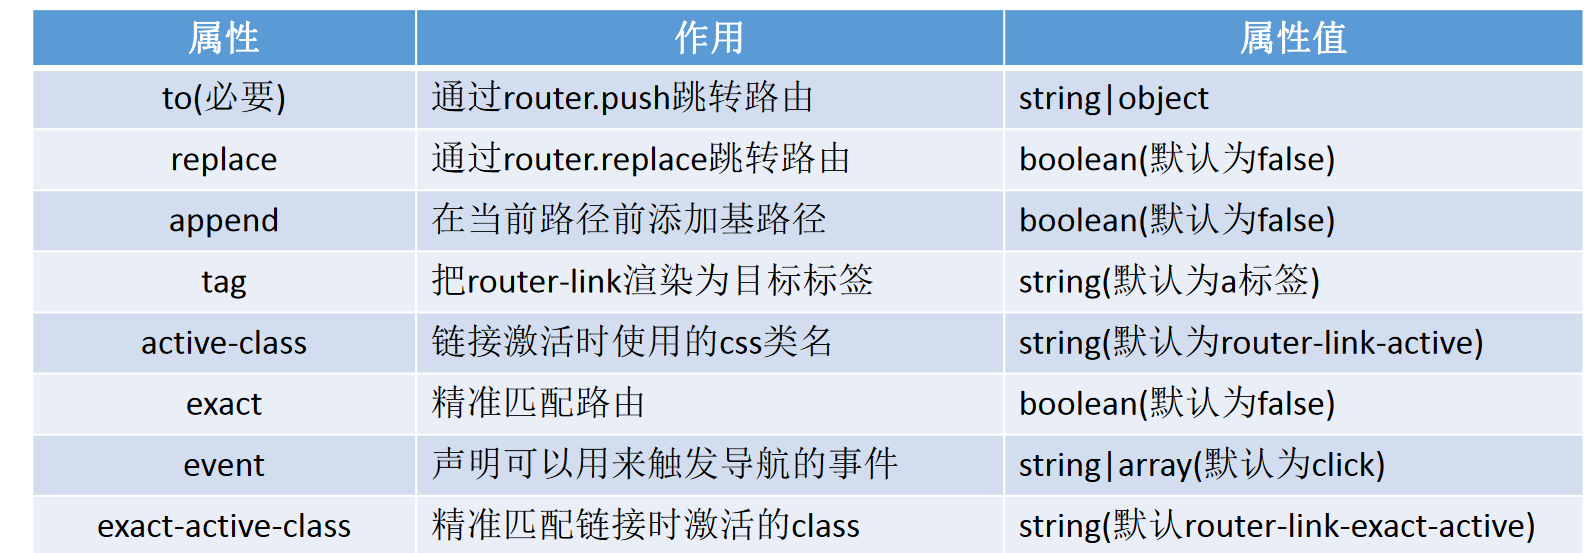
router 标签
router中常用的标签为
- router-link:路由连接标签,最终被解析为a标签。
- router-view:路由插槽,用于视图显示区域。
router的跳转方式:
• push: 向history 栈添加一个新的记录,可以使用浏览器的back按键返回。
• replace:直接替换当前浏览器路径,无法返回。
• route : 路由信息对象,只读对象,可以读取当前组件路由信息。
示例
Login.vue
<template>
  <div>
    登录组件
    <router-link to="Home">主页</router-link> //添加链接,点击跳转home组件
  </div>
</template>

<script>
export default {
  name: "Login"
}
</script>

<style scoped>
/*scoped只在当前组件起作用,不影响父组件*/

</style>
router传参
Login.vue
<template>
  <div>
    登录组件
    <!-- 用v-bind: 传参 -->
    <router-link :to="{name:'Home', params:{userName :'李雷'}}" tag="button">主页</router-link>
    <router-link :to="{path:'/Home', query:{userName2 :'query传的参'}}" tag="button">主页</router-link>
    <button @click="toHome">主页</button>
  </div>
</template>

<script>
export default {
  name: "Login",
  methods: {
    toHome(){
      this.$router.push({name:'Home', params:{userName:'李雷'}})
    }
  },

}
</script>

<style scoped>
/*scoped只在当前组件起作用,不影响父组件*/

</style>
Home.vue
<template>
  <div>
    <!-- 花括号接收传参 -->
    主页组件,{{userName}}
    <br>
    {{this.$route.query.userName2}}
  </div>
</template>

<script>
export default {
  name: "Home",
  data() {
    return {
      userName:''
    }
  },
  created() {
    this.userName = this.$route.params.userName //接收传参
  },
}
</script>

<style scoped>

</style>
导航守卫
全局路由守卫:beforeEach
守卫的参数:每个守卫函数都具备如下三个参数,通过参数可以获取跳转前、跳转后的路由对象。
• to:要进入的目标路由对象
• from:正在离开的路由对象
• next:函数,只有调用该函数,导航钩子才会被resolved
main.js
// The Vue build version to load with the `import` command
// (runtime-only or standalone) has been set in webpack.base.conf with an alias.
import Vue from 'vue'
import App from './App'
import router from './router'

Vue.config.productionTip = false

//全局路由守卫
router.beforeEach((to, from, next) => {
  console.info(to.name, from.name)
  next()//执行组件切换
  // to and from are both route objects. must call `next`.
})
/* eslint-disable no-new */
new Vue({
  el: '#app',
  router,
  components: { App },
  template: '<App/>'
})
axios连接服务器
需要先配置代理服务器api,避免跨域请求
main.js
import Vue from 'vue'
import App from './App'
import router from './router'
import axios from 'axios'

Vue.config.productionTip = false
//设置axios为Vue的属性$axios
Vue.prototype.$axios = axios

config/index.js
config/index.js
module.exports = {
  dev: {

    // Paths
    assetsSubDirectory: 'static',
    assetsPublicPath: '/',
    proxyTable: {
        '/api': {
          target: 'http://127.0.0.1:9090/day9_7_war_exploded',
          changeOrigin: true,
          pathRewrite: {
            '^/api': ''
          }
        }

    },
Login.vue
  methods:{
    login(){
      this.$axios({
        url:'api/user/login',
        method:'post',
        data:{
          userId:this.userId,
          password:this.password
        }
      }).then((result) => {
        console.info(result)
      }).catch((err) => {
        console.info(err)
      });

    }
  }